How to Transfer PayPal to Cash App: A Comprehensive Guide
In today’s digital age, managing finances often involves juggling multiple platforms. Two of the most popular are PayPal and Cash App. While both facilitate online transactions, they don’t directly integrate for fund transfers. This article provides a detailed, fact-checked guide on how to transfer money from PayPal to Cash App, exploring various methods and their associated considerations. Whether you’re a freelancer needing quick access to your earnings or simply consolidating your accounts, understanding these processes is crucial.
Understanding the Limitations: Direct Transfer Isn’t Possible
It’s important to start with the fundamental limitation: there’s no direct, one-click option to send money from PayPal to Cash App. These platforms operate as separate ecosystems. However, several workarounds exist, each with its own advantages and disadvantages. This article will walk you through the most effective solutions.
Method 1: Using a Bank Account as an Intermediary
The most common and generally reliable method involves using a bank account as a bridge between PayPal and Cash App. Here’s a step-by-step breakdown:
Step 1: Link Your Bank Account to Both Platforms
First, ensure your bank account is linked to both your PayPal and Cash App accounts. This is a standard verification process involving confirming small test deposits or using your online banking credentials. Most major banks are compatible with both platforms.
Step 2: Transfer Funds from PayPal to Your Bank Account
Log into your PayPal account. Navigate to your wallet and select the option to transfer funds. Choose your linked bank account as the destination. Enter the amount you wish to transfer and confirm the transaction. Note that PayPal may charge a fee for instant transfers, while standard transfers typically take 1-3 business days. Consider the timing based on your needs.
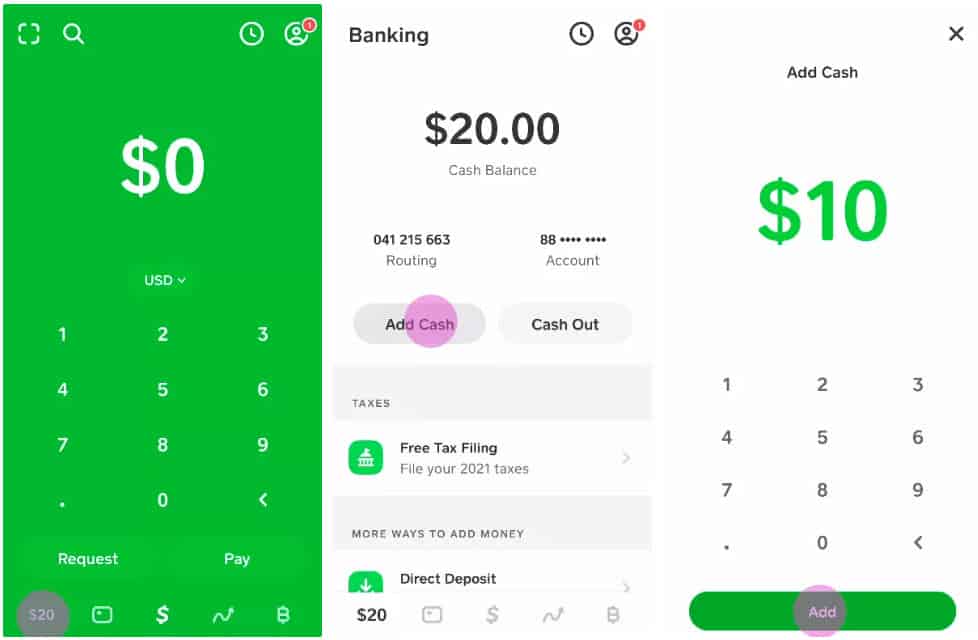
Step 3: Transfer Funds from Your Bank Account to Cash App
Once the funds are available in your bank account, open your Cash App. Tap on the “Add Cash” button. Enter the amount you want to transfer from your bank account. Select your linked bank account as the source of funds. Confirm the transaction. The funds should appear in your Cash App balance almost immediately.
Pros and Cons of Using a Bank Account
- Pros: Generally reliable, widely accepted, and avoids third-party apps.
- Cons: Can take 1-3 business days for PayPal transfers to your bank, potential fees from PayPal for instant transfers.
Method 2: Using a Debit Card as an Intermediary
Another method to transfer PayPal to Cash App involves using a debit card. This method can be faster than using a bank account, but it may also incur fees.
Step 1: Link Your Debit Card to Cash App
If you haven’t already, link your debit card to your Cash App account. This is a straightforward process within the app’s settings.
Step 2: Transfer Funds from PayPal to Your Debit Card (If Possible)
This step depends on your PayPal account setup. Some PayPal accounts allow you to directly withdraw funds to a debit card. If this option is available, select your linked debit card as the destination when transferring funds from PayPal.
Step 3: Add Funds from Your Debit Card to Cash App
Once the funds are available on your debit card (or immediately if you used the direct withdrawal method), use the “Add Cash” feature in Cash App to add the funds from your debit card to your Cash App balance.
Pros and Cons of Using a Debit Card
- Pros: Potentially faster than using a bank account, especially if direct debit card withdrawal from PayPal is available.
- Cons: May incur fees from both PayPal and Cash App, direct debit card withdrawal from PayPal isn’t always available.
Method 3: Using a PayPal Cash Card (If Applicable)
If you have a PayPal Cash Card, you can use it to withdraw cash from an ATM and then deposit that cash into your Cash App via a mobile check deposit or by adding cash at a participating retailer. This method is less convenient but can be useful in certain situations.
Step 1: Withdraw Cash from an ATM
Use your PayPal Cash Card to withdraw the desired amount of cash from an ATM. Be aware of any ATM fees that may apply.
Step 2: Deposit Cash into Cash App
You have two options for depositing the cash into your Cash App account:
- Mobile Check Deposit (if available): Some banks allow you to deposit checks (and sometimes cash) via their mobile app. Deposit the cash into your bank account using this method, then transfer the funds from your bank account to Cash App as described in Method 1.
- Add Cash at a Retailer: Cash App partners with various retailers (e.g., Walmart, Walgreens) that allow you to add cash to your account. Follow the instructions within the Cash App to find a participating retailer and complete the deposit.
Pros and Cons of Using a PayPal Cash Card
- Pros: Can be useful if you need physical cash, bypasses the need for a direct bank transfer.
- Cons: Inconvenient, ATM fees may apply, requires finding a participating retailer for cash deposits.
Method 4: Using Third-Party Services (Caution Advised)
While less common, some third-party services claim to facilitate transfers between PayPal and Cash App. However, it’s crucial to exercise extreme caution when using these services. Many are unverified, may charge exorbitant fees, and could potentially be fraudulent. Thoroughly research any third-party service before entrusting them with your financial information. Look for reviews, check their security protocols, and be wary of promises that seem too good to be true. We do *not* recommend using unverified third-party services to transfer PayPal to Cash App.
Pros and Cons of Using Third-Party Services
- Pros: Potentially faster and more direct than other methods (but often at a high cost and risk).
- Cons: High risk of fraud, potential for hidden fees, lack of security and regulation.
Security Considerations
When transferring funds between platforms, security should be your top priority. Always use strong, unique passwords for your PayPal, Cash App, and bank accounts. Enable two-factor authentication whenever possible. Be wary of phishing scams and never share your login credentials with anyone. Regularly monitor your account activity for any unauthorized transactions. If you suspect fraud, immediately contact PayPal, Cash App, and your bank.
Fees and Timing
Be aware of the fees associated with each transfer method. PayPal typically charges fees for instant transfers to bank accounts and debit cards. Cash App may also charge fees for certain transactions. Transfer times can vary depending on the method used. Standard bank transfers from PayPal can take 1-3 business days, while debit card transfers and Cash App transfers are usually processed instantly. Factor in these fees and timing considerations when choosing the best method for your needs. Understanding these costs and timelines can help you avoid surprises and manage your finances effectively.
Conclusion: Choosing the Right Method to Transfer PayPal to Cash App
While there’s no direct way to transfer funds from PayPal to Cash App, the methods outlined in this article provide viable solutions. Using a bank account as an intermediary is generally the most reliable and cost-effective option, although it may take a few business days. Using a debit card can be faster, but may incur fees. Avoid unverified third-party services due to the high risk of fraud. Always prioritize security and be aware of the fees and timing associated with each method. By carefully considering your options, you can effectively manage your funds across these popular digital platforms. Ultimately, the best approach depends on your individual needs and preferences.
Navigating the world of digital finance requires understanding the nuances of each platform and the available workarounds. By staying informed and taking necessary precautions, you can seamlessly transfer money from PayPal to Cash App and maintain control over your finances.
[See also: Setting up a PayPal Business Account]
[See also: How to Verify Your Cash App Account]
[See also: Understanding PayPal Fees]
